Friday, August 23, 2013

Family Emergency Plan

Living here in the mountains has taught me a lot.  The most important thing is to be prepared for anything.  Don't leave anything to chance when it comes to your family and your life.  For this reason I am putting together my own Family Emergency Plan.  Sounds complicated, I know but if you are willing to follow along I'll try to make it easy and fun. 

Every two weeks I'll be posting the next task for setting up a family emergency plan.  Stay tuned for the next post with the first task.


Task One 08/24/2013
Task One Update 08/31/2013 

Task Two 09/07/2013

Tuesday, August 20, 2013

Go Bag - Dog Edition


Since my dog is a big part of my little family she needs her own supplies should we need to evacuate.  This can pose a problem.  Just like us Winter would need food and water as well as any medications and important documents(vaccine records etc).  This is added weight in my pack that will carry the bulk for Roo and I.  The solution is to get Winter her own packs and train her to carry them with some of her own supplies.

Now the rule of thumb for dog packs is they should carry no more than 1/4 to 1/3 the dog's body weight in supplies.  Winter is about 25-27 lbs depending on if she likes her kibble.  This puts her load weight at 6-9 lbs total- about 3-4 lbs on each side of the packs.  This could be a 4 lb bag of dry kibble on each side or some water bottles.  Making sure we get the most out of this weight limitation is very important.

The other option is a travois.  Now this has its own set of issues since we live in a very rocky mountain area.  This would have to be a project for another time...

Winter's Go Bag:
  • freeze dried dog food
  • water bottles/ purification tablets
  • collapsible bowl
  • dog hiking booties
  • bed roll
  • tick key
  • first aid kit
  • toys
  • treats
There are a lot of food options out there for humans as well as dogs!  Doing the research for the right food for Winter's bag was a long and stressful process.  I narrowed the field to freeze dried and dehydrated dog foods to help make the most of the weight limit in the packs.  Since Winter is a picky eater I know it has to be something she will eat verses an untested food.  I had to contact lots of dog food companies for info and samples to see what would work.  The brands I couldn't get samples for I had to buy small packages and try them out that way.

Now for longevity in Winter's packs food had to be packed in mylar with an oxygen absorber or vacuum sealed with my Foodsaver.  It will keep for a while and have to be rotated out but not as soon as if I left everything in their manufactures packaging.  These methods will work for dry kibble if this is your preferred food.

There are lots of resources online as to what to pack for your dog in their Go Bag but I feel it can be a bit personal.  Everyone cares for their dog differently so what you pack may be completely different from what I packed for Winter.

Here are some links to help you if you decide a Go Bg is right for your dog.

Dog Bug Out Bag | Preparing Your Pet in Case of Emergency

Bug-out bag for dogs: are both you and your dog ready?

Homemade Raspberry Jam

I enjoy making my own jams for 2 reasons.  #1 I know what goes into it and I can decide how much sugar (if any) is in it.  #2 I save money.  A jar of jam at the store can cost $4-8 for 12 oz.  When I make my own I end up with 6-9 jars of jam for that price.

My basic recipe is not really my own but a little bit from a few different recipes/instructions.


Ingredients
  • raspberries (about 8 cups whole berries)
  • pectin
  • sugar
Instructions

  • Wash and sterilize your jars.  Since I water bath my jams I have to wash then boil my jars to make sure they are clean and bacteria free before filling with my jam.  If you have a dishwasher (I don't) you can run them through a wash and sterilizing cycle.  Washing your jars includes the lids.
  • Wash berries in cool water.  Remove any mushy berries and non edibles (leaves and stems etc)
  • Measure out your berries making sure you stay under 8 cups of whole berries (6 cups mashed).  Pectin will not gel in large batches so if you want lots of jam make it in smaller batches.
  • Mash the berries.  You can use a Foley Food Mill, food processor, potato masher or a blender.  I have tried all of these and find that it makes no difference in the taste.
  • Measure the sugar.  Depending on the type of pectin you are using the amount of sugar will vary.  I use low-sugar pectin so I follow the measurements on the box for how much sugar is needed.
  •  Bring to a boil the berries and pectin.  Just to the point you can't stir away the boil.
  • Add sugar and heat again.  A low boil to help melt the sugar and mix it well with the berries and pectin.  Boil for about a minute or two more.
  • Fill your jars with the berry mixture.
  • Seal jars.  Wipe the threads and rim of your jars before putting on the lids and bands.
  • Put the sealed jars in the water bath canner so there is a few inches of water covering them.  Bring the canner to a boil for 10 minutes.
  • Take canner off the heat and remove the lid.  Let it sit for 5 minutes before removing the jars.
  • Set the hot jars on a towel on the counter or table to cool.
  • Put the jars away for later use.
  • Enjoy. Yum.


Friday, August 16, 2013

Rainy Day Cash Stash

I am a shopper.  I enjoy going out and shopping- be it window shopping or even grocery shopping!  The down side is I can lose track of my spending (even at a thrift store) and go over budget.  I have even dipped into my rainy day cash to go shopping.

Well here is my rainy day cash stash idea that will prevent me from dipping in for shopping cash.

You will need 2 things- a glass bottle with a long narrow neck you can't reach into and a small bottle of craft paint.

A wine bottle works well and you don't have to buy a decorator bottle like I did.  I got a purple tinted bottle from the store and white paint.  I poured a small amount of paint in the bottle and rolled it around to coat the inside of the bottle.  Since my bottle was tinted the white paint brightened the tint.   Make sure you leave the cork/cap off the bottle until the paint is 100% dry.  I made this mistake thinking the bottle was dry and the paint pooled at the bottom.


You can pick any color paint you want.  The paint is to shield your cash stash from prying eyes.  Since coins can't fit through the neck of the bottle no worries about the snoop who will give it a shake.  Because the bottle is glass the only way to get the cash is to break it.  Great way to tell if someone has taken your money or to prevent yourself from spending it.

I recommend having a few of these painted bottles to prevent them from looking out of place.  You can even use a taper candle as the 'cork' and give the bottles a purpose as candle holders.

Friday, August 9, 2013

The truth about using LED light bulbs...

Reducing your electricity usage and your bill is more than just turning off lights when you leave a room...

After moving into this cabin my electric bill went up quite a bit from what I was use to.  I don't want to spend an extra $30-60 a month as that defeats the purpose of moving my tiny family to the middle of nowhere to be more self sufficient. 

I invested in some 4 watt LED light bulbs in hopes this would help.  The bill went down but not to levels I was happy with!  I also noticed that when the switch to the kitchen light was off the bulbs still were lit up a bit.  So my 4 watt LED bulbs were saving me a little money but were still turned on 24/7...

The cabin was built in the early 1970s so I had a thought that the wiring might be shot/chewed by mice or just plain faulty.  I had an electrician come by to take a look at the kitchen light in hopes it was a cheap fix.  Here is what he told me about my LEDs...

You can not use LED or CLF (the coil fluorescent) bulbs in fixtures that have dimmer switches.

It seems that standard dimmer switches allow a small amount of current to run to the fixture even when turned off.  LED and CLF bulbs are very low wattage and will use that current to light up.  It is all in how the driver in the bulbs process the current.  This will burn the bulbs out faster costing you more money in replacements and used wattage. 

To prevent this from happening you can only use LED and CLF bulbs in fixtures with toggle style switches.  You can buy dimmers rated for CLF and LED bulbs but they are really expensive.  So I have changed all the dimmers to toggle switches.  This way I can use my LEDs without issue or ridiculous bills...

Go Bag - Toddler Edition

Roo and I live in the middle of nowhere on a mountain.  Since there is a national forest below us on the mountain there are campgrounds.  Campgrounds draw all types even the moronic- those people who have no clue as to how to start, maintain and/or put out a camp fire.  Whatever the reason be it they are too drunk, stoned or just stupid these people are a real threat to our way of life.  That is why I have set up "Go Bags" for Roo and myself.  A Go Bag is also known as a Bug Out Bag (BOB) or a Get Out Of Dodge Bag (GOOD Bag).

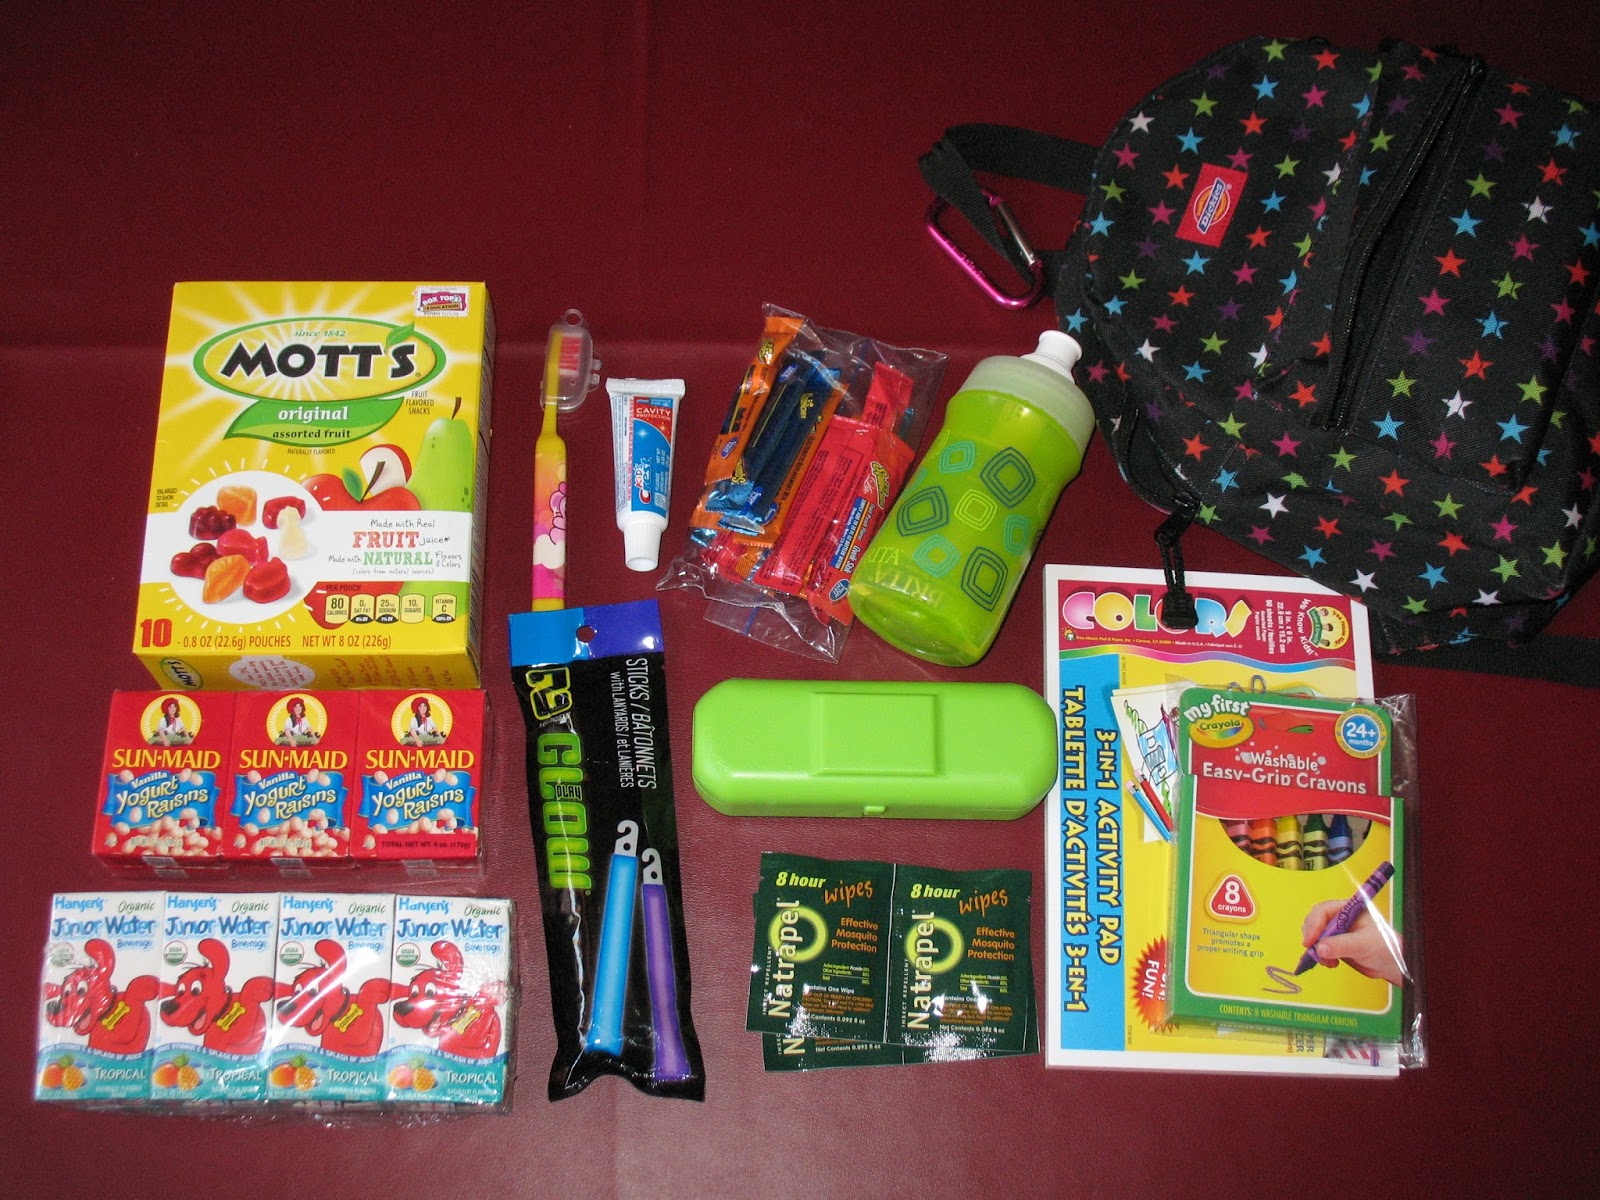
Roo is my heart so her bag was the first to be completed.  It is a small mini backpack normally sold as a purse to teen girls.  I found it at a thrift store in near perfect condition.  It has padded straps and 2 pockets.  I like it over the cartooned backpacks because it is made from a heavier fabric like a normal canvas backpack.

As far as the contents...
  • Britta Kids filtering water bottle
  • hydration drink powder sticks
  • toothbrush and toothpaste
  • fruit snacks
  • raisins
  • juice boxes
  • kids first aid kit with bug repellent wipes
  • crayons and paper pad
  • glow sticks


Since Roo is only a toddler I can't over load her little back with everything she would really need in a Go Bag.  I have put a few things in her bag that she can carry and would not be an issue should her bag be lost or misplaced along the road.  Also in her bag but not pictured is a small plush toy just for her bag.  This is like letting her bring a bit of home with us should we have to leave due to fire or other disaster.


*Added to my bag for safe keeping are copies of important documents, 3-7 days food, water, changes of clothing (vary depending on weather) and a more extensive first aid and survival kit.

Tuesday, August 6, 2013